I'll be using a free, open source graphics program called GIMP. I find it to be capable of doing just about anything you could want do in Photoshop. You can find the website and download it at:
http://www.gimp.org/downloads/
Click on the 'Show all downloads' to see additional download links for Windows and Mac.
After downloading and installing GIMP, launch the program and open the photo you want to prepare.
There are two possibilities here. If you're lucky, and your work is fairly symmetrical, you might get away with simply cropping your image to 1920x1920. If your file is less than 1920x1920 to begin with, I wouldn't recommend enlarging it, because that can degrade the detail.
The other technique is adding black bars to fill out the image to the square format, since most cameras shoot rectangular frames. It's a bit trickier, but GIMP can handle it.
First, the crop method:
I load my image, and the top bar on the image window tells me it's 2592x3872, so I'm good to go for a crop.
The top-leftmost tool in the toolbox panel is the rectangular select tool. Choose that, then scroll down to the section that says Fixed [Aspect ratio], check the Fixed box, and click the dropdown next to Aspect ratio and select [Size]. Enter 1920x1920.
Now, when you click and hold the right mouse button over your image, a 1920x1920 crop box will appear that you can drag around until the image is properly framed. If you accidentally release the mouse, or don't like your selection, undo by either clicking outside the image, or pressing [Ctrl][Z].
Now go up to the Image menu, and select Crop to Selection
Done!
This is a nice, close up image, ready for the jury. But if I decide maybe a 1920x1920 crop is a bit too tight and I want more breathing room around my vase, or maybe I have a tall skinny piece, or a low wide bowl, using the black bars might be a better way to go.
For the black bar method, we need a little more effort. This is for rectangular images that have either been shot that way straight out of the camera, or cropped to get a nice close shot.
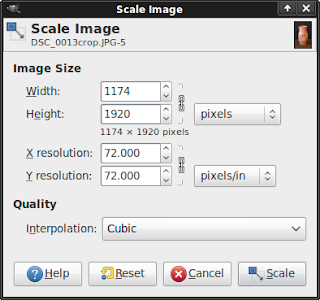
First, we want to scale the image to 1920 on whatever is the longest side. After opening the image in GIMP, go to the Image menu and select [Scale Image] and enter 1920 in whatever is the largest dimension. Press [Enter] and you'll see the other dimension change to keep the same aspect ratio. Then click [Scale].
(After scaling, you might need to zoom in a little. Go to View > Zoom to do this if necessary.)
Now we need to enlarge the actual image size, called the 'canvas', to 1920x1920.
Select [Image] [Canvas size], and click on the chain icon to the right to break the aspect ratio lock.
Then, make the size 1920x1920, click [Center], then [Resize]. You'll now have your image with a checkerboard pattern indicating the actual canvas size.
Now we need to add the black bars by putting a black layer under this one.
Add new layer by clicking the new layer button on the Layers panel.
Make sure it's set to 1920x1920, foreground color (which is black).
GIMP will create the layer on top of the image layer. Just click and drag the new black layer down under the image layer in the Layers panel.
And we're done!
I hope this tutorial gives you all a feel for some of the capabilities of GIMP.


