With the help of some extra time during the holidays, I've been able to complete one of my goals for 2010 -- to move my blog from blogger to my own domain. Its at
http://www.brianfieldspottery.com/
I've been working on it for several months now, and I'm to the point where I feel comfortable to have visitors. There's still some tweaking going on, but the big pieces are in place.
Those of you reading this through a feed -should- be switched automatically, but if you don't see a Welcome post from the new blog after this one, you might want to double check or resubscribe to the new feed located here- http://feeds.feedburner.com/BrianFieldsPottery
Tuesday, December 28, 2010
Tuesday, October 19, 2010
Thinking about kilns
I've been reading a few books on kiln building lately, trying to figure out something that will work at home without having a full-blown kiln yard in the backyard. Ideally portable, easy to set up, (fairly) easy to fire. Since I tend to make lowfire work, looking at smaller more primitive alternative kilns has given me a few ideas. Mixing that in with modern technology, materials, and know-how should lead me to come up with something. I'm leaning toward a ceramic fiber cylinder (or possibly cube), fired with a propane gas burner or two. Ideally, I'd like it to be able to do a low bisque, and be capable of tinfoil sagger, raku, or horsehair firings. It might end up being a single base with different interchangeable chambers, I don't know. I'm just getting to the point of actually trying to run the numbers and calculations on heat output and retention.
Coincidentally, I ran across this video of an archeological team that found an old kiln site in France and decided to try firing it. The audio is in French, but it's just interesting to watch and follow along as they rebuild the walls and fire it.
The Google translated link so you can read the text is here.
Enjoy!
Tuesday, September 14, 2010
Tech Tuesday - Using GIMP to prep a photo for CaFE entries
Today I'm going to look at how to get your images ready for electronic submission. For the purposes of this post, I'll assume we're posting to Call for Entry aka CaFE. CaFE wants images that are square, and 1920x1920 pixels. The other major electronic entry site, Zapplication, also requires at minimum an image that is 1920 on the longest side. If it's not square, they will square it and add the black bars during projection. Personally, I'd rather just do it and know that I can send the image to either place without worrying about it.
I'll be using a free, open source graphics program called GIMP. I find it to be capable of doing just about anything you could want do in Photoshop. You can find the website and download it at:
http://www.gimp.org/downloads/
Click on the 'Show all downloads' to see additional download links for Windows and Mac.
After downloading and installing GIMP, launch the program and open the photo you want to prepare.
There are two possibilities here. If you're lucky, and your work is fairly symmetrical, you might get away with simply cropping your image to 1920x1920. If your file is less than 1920x1920 to begin with, I wouldn't recommend enlarging it, because that can degrade the detail.
The other technique is adding black bars to fill out the image to the square format, since most cameras shoot rectangular frames. It's a bit trickier, but GIMP can handle it.
First, the crop method:
I load my image, and the top bar on the image window tells me it's 2592x3872, so I'm good to go for a crop.
The top-leftmost tool in the toolbox panel is the rectangular select tool. Choose that, then scroll down to the section that says Fixed [Aspect ratio], check the Fixed box, and click the dropdown next to Aspect ratio and select [Size]. Enter 1920x1920.

Now, when you click and hold the right mouse button over your image, a 1920x1920 crop box will appear that you can drag around until the image is properly framed. If you accidentally release the mouse, or don't like your selection, undo by either clicking outside the image, or pressing [Ctrl][Z].

Now go up to the Image menu, and select Crop to Selection

Done!

This is a nice, close up image, ready for the jury. But if I decide maybe a 1920x1920 crop is a bit too tight and I want more breathing room around my vase, or maybe I have a tall skinny piece, or a low wide bowl, using the black bars might be a better way to go.
For the black bar method, we need a little more effort. This is for rectangular images that have either been shot that way straight out of the camera, or cropped to get a nice close shot.
And we're done!

When we're ready to save our new image, just click [File] [Save], [Export] -- this flattens the image into a single .jpg file.
I hope this tutorial gives you all a feel for some of the capabilities of GIMP.
I'll be using a free, open source graphics program called GIMP. I find it to be capable of doing just about anything you could want do in Photoshop. You can find the website and download it at:
http://www.gimp.org/downloads/
Click on the 'Show all downloads' to see additional download links for Windows and Mac.
After downloading and installing GIMP, launch the program and open the photo you want to prepare.
There are two possibilities here. If you're lucky, and your work is fairly symmetrical, you might get away with simply cropping your image to 1920x1920. If your file is less than 1920x1920 to begin with, I wouldn't recommend enlarging it, because that can degrade the detail.
The other technique is adding black bars to fill out the image to the square format, since most cameras shoot rectangular frames. It's a bit trickier, but GIMP can handle it.
First, the crop method:
I load my image, and the top bar on the image window tells me it's 2592x3872, so I'm good to go for a crop.
The top-leftmost tool in the toolbox panel is the rectangular select tool. Choose that, then scroll down to the section that says Fixed [Aspect ratio], check the Fixed box, and click the dropdown next to Aspect ratio and select [Size]. Enter 1920x1920.

Now, when you click and hold the right mouse button over your image, a 1920x1920 crop box will appear that you can drag around until the image is properly framed. If you accidentally release the mouse, or don't like your selection, undo by either clicking outside the image, or pressing [Ctrl][Z].

Now go up to the Image menu, and select Crop to Selection

Done!

This is a nice, close up image, ready for the jury. But if I decide maybe a 1920x1920 crop is a bit too tight and I want more breathing room around my vase, or maybe I have a tall skinny piece, or a low wide bowl, using the black bars might be a better way to go.
For the black bar method, we need a little more effort. This is for rectangular images that have either been shot that way straight out of the camera, or cropped to get a nice close shot.
First, we want to scale the image to 1920 on whatever is the longest side. After opening the image in GIMP, go to the Image menu and select [Scale Image] and enter 1920 in whatever is the largest dimension. Press [Enter] and you'll see the other dimension change to keep the same aspect ratio. Then click [Scale].

(After scaling, you might need to zoom in a little. Go to View > Zoom to do this if necessary.)
Now we need to enlarge the actual image size, called the 'canvas', to 1920x1920.
Select [Image] [Canvas size], and click on the chain icon to the right to break the aspect ratio lock.

Then, make the size 1920x1920, click [Center], then [Resize]. You'll now have your image with a checkerboard pattern indicating the actual canvas size.
Now we need to add the black bars by putting a black layer under this one.
Add new layer by clicking the new layer button on the Layers panel.

Make sure it's set to 1920x1920, foreground color (which is black).

GIMP will create the layer on top of the image layer. Just click and drag the new black layer down under the image layer in the Layers panel.

And we're done!

I hope this tutorial gives you all a feel for some of the capabilities of GIMP.
Saturday, September 11, 2010
BISHOC pt.II
It's been a good summer. Except for a couple weeks when the schedule just wouldn't allow it, I've been able to get my 'butt in studio' and keep my schedule. It feels good to make a schedule and keep it. It's taken a while, but the skills and speed are slowly returning. Not that I'm a fast, production potter anyway, but man was I SLOW when I first started back!
Blogging regularly, however, has been more of a challenge. I've been working on some things behind the scenes, but my posting has suffered for it.
One of my next projects is to put together a photo setup so I can get some new photos of my work posted and out there.
Blogging regularly, however, has been more of a challenge. I've been working on some things behind the scenes, but my posting has suffered for it.
One of my next projects is to put together a photo setup so I can get some new photos of my work posted and out there.
Wednesday, July 7, 2010
Terra tests and bat issues
Over the long weekend I finished preparing my terra sig that I started in the garage way back in January. It's been settled and siphoned off 2 or 3 times so should be extra fine. I got my test pieces prep'ed and ready for firing. Keeping my fingers crossed for good results there. Next I want to do a batch of white terra sig. Maybe this time it won't take me 6 months to get it made!
So far so good on studio time. This will be week 3 of getting in the studio consistently. It feels good. I've missed it.
I tried throwing on a hydrastone bat yesterday. It didn't go as well as I'd hoped for a couple reasons. First, I'm not used to throwing on bats. Isn't it true we tend to continue the way we were taught? I learned to throw on the wheelhead and that's just what I do now. Second, I had some stiff clay. Just not helpful when learning something new to be fighting your clay. Third, the bat seemed very 'grabby' - sticking to the side of my hand as I was trying to center, etc. I did try and wet the bat down with my sponge, but should I have maybe soaked it?
Saturday, June 26, 2010
Back to it

Truth be told, I've been more than a little nerved out, basically starting over after so long away. But the art center is a great place, with great people, and all that crap in my head soon melted away.
One of my friends saw me there and welcomed me back. I told him I wasn't sure what I'd accomplish, but I had to start somewhere. He said, 'ahh, don't worry about it, it's just like riding a bicycle.' I said I just didn't want to fall off and skin my knee!
I started with 2 one pound bowl/dishes that have a domed lid. I wanted to make some forms for tests I want to do with the terra sig fermenting in the garage....(gotta go deal with that this weekend). I'm wanting to try something 'different' (is there such a thing?) and want to minimize the risk to other work in the kiln, hence the lid/cover. I figure theres only about a 2% chance of something bad happening, but I don't want my work to end up on the 'Wall of Shame' and be branded one of 'those people'.
I still had some time, so I made the jump to 4lbs. I tried a tall bottle form, and it wasn't half bad. My clay was ok, but a bit stiff, so it wasn't pulling up very easily. Probably a pound carved off in my fingers trying to get it to raise. Whatever. I'll get new clay soon, but this is good enough for now. I want to use up the rest of the bag and it won't take long. You can see an aforementioned wall of shame piece sitting in the background, welded to the kiln shelf with glaze when the bottom cracked out and glaze ran under the piece.
Friday, June 25, 2010
Update
After yet another lapse, I'm giving it another try. The schedule never came together in April, and completely fell apart when the whole house came down with the flu, out of town guests, and a couple medical procedures thrown in for good measure.
So here I am, 2 months later. In summary:
- I need a lot more practice making lids, and using my new calipers. Even with them, I managed to make lids that were a bit too small. They fit, but are sloppy/loose in the gallery. At least they don't fall through!
- I've somehow made it on to a list of '50 Inspiring Pottery Blogs' -- I haven't been feeling very inspiring or inspired lately, but it's a great goal to shoot for!
- I have about a million ideas that I've collected in my brain in my off-time, and I need to organize, edit, reduce, and make a plan for trying them out.
Onward!
Friday, June 18, 2010
BISHOC !
What's that you say?
Well, I've taken the liberty of modifying the acronym BICHOK that some writers use - Butt In Chair, Hands On Keyboard - or sometimes simply 'BIC' to something more alligned to my goals, thus:
Butt In Studio, Hands On Clay.
More to come . . .
Well, I've taken the liberty of modifying the acronym BICHOK that some writers use - Butt In Chair, Hands On Keyboard - or sometimes simply 'BIC' to something more alligned to my goals, thus:
Butt In Studio, Hands On Clay.
More to come . . .
Wednesday, April 7, 2010
Put a lid on it!
I got back to the studio this week and started some lidded pots. I haven't made a whole lot of lidded pieces before. I've never been good at throwing the lids, but I also know I won't get better until I start throwing more lids!
So I watched a few youtube vids to get some ideas and different techniques and styles and dove in. And what do you know, I did actually start getting better at it! Why do we avoid doing things like lids and pulling handles anyway? Practice makes perfect and all...
And, it gave me a chance to try out my new lid caliper -- It's a California Pottery Tools caliper. I like that it locks, and has a measurement ruler right on the tool so it doubles as a regular ruler too. I remember reading someone else liked this particular tool but couldn't find one. I tried to find the blog post but struck out. If you're out there - Bailey Pottery Supply sells them here : http://www.baileypottery.com/potterytools/newtools.htm#California
I still may end up getting a LidMaster (I've used the community one at the studio), but I really like the CPT tool.
I'll be back today, to hopefully trim and fit my lids and see which one fits best.
Friday, April 2, 2010
April Goals
I was back at it (again) in the studio this week. I'm to the point now that I need to see if I can establish some sort of regular schedule again. I've set a goal of two nights a week for now.
The first night was mainly experimentation. Finding out just how out of shape I am, where my skills are at, that sort of thing. I threw 2 pieces in a little over an hour. I'm a rather slow thrower, so that wasn't terribly bad. Then I cut them down the middle to look at wall thickness, bottom, etc. They actually weren't too bad, considering I'd used the clay thats been in the bag for 3-4 months and was almost too stiff to be usable. I'd wedged some water back in, but it was still pretty bad.
The second night, new clay. World of difference. Actually made a couple pieces that might see the kiln.
I have some terra sig that I started in January in the garage that needs some attention. It's been settled and siphoned once, and been setting ever since. Since it's settled, I think I might try siphoning off some of the top water to shortcut the evaporation/concentration a bit. Then I want to see what it does on my pots.
Monday, March 22, 2010
Earth Hour 2010
This Saturday night, March 27, from 8:30-9:30PM local time -wherever you are- is International Earth Hour. Show your support for climate issues by flipping off your lights for one hour.
Last year nearly a billion people participated from 4100 cities and 87 countries, including 80 million Americans in 318 cities. Also many cities corporations and organizations showed their support by going dark for an hour, including
Join us in turning off your lights for one hour, and spread the word!
Last year nearly a billion people participated from 4100 cities and 87 countries, including 80 million Americans in 318 cities. Also many cities corporations and organizations showed their support by going dark for an hour, including
- Empire State Building
- Brooklyn Bridge
- Broadway Theater Marquees
- Las Vegas Strip
- United Nations Headquarters
- Golden Gate Bridge
- Seattle’s Space Needle
- Church of Latter-Day Saints Temple
- Gateway Arch in St. Louis
- Great Pyramids of Giza
- Acropolis and Parthenon in Athens
- Christ the Redeemer Statue in Rio de Janeiro
- St. Peter’s Basilica in Vatican City
- Big Ben and Houses of Parliament in London
- Elysee Palace and Eiffel Tower in Paris
- Beijing’s Birds Nest and Water Cube
- Symphony of Lights in Hong Kong
- Sydney’s Opera House
Join us in turning off your lights for one hour, and spread the word!
Tuesday, March 9, 2010
Tech Tuesday - Going International
This week I'm going to talk about the non-English speaking parts of the world. Do you have any foreign readers? For example, this blog as seen visitors from 67 countries since beginning in August 2008. The top 10 languages being English, Portuguese, Italian, French, Czech, German, Dutch, Spanish, Polish, and Turkish. Among the most pages viewed per visit, then top languages are (surprisingly), Norwegian, Korean, Danish, Portuguese, Turkish, French, Japanese, and Finnish. English makes it's appearance down at #20.
Or maybe there's a blog that you want to read that's written in French? I'll show you how to do that also.
It didn't occur to me right away that people in other countries might find this blog worth it to read. I didn't even know how many English speaker would. But soon after starting out, I began to see an occasional visitor from a far off country. I began to wonder if they knew English, or were translating me somehow. I thought that if they were finding my blog, the least I could do was make it easier for them to read. Maybe you've noticed I have a Google Translate button prominently at the top of the right column. This will translate all the text on the page into whatever language you'd like to see it in. Go ahead, play with it for a minute, I'll wait....
Pretty cool, right?
To add a Google Translate widget to your blog, go to your Blogger [Layout] tab, and click on Add Gadget.
Select the HTML/JavaScript gadget. Then paste this script into the code section:
Then click [Save] and you're all set.
Now anyone who doesn't speak English (or actually whatever language you write your blog in) can translate your blog when they land on it.
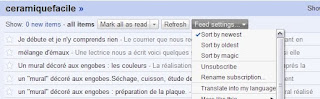
So what if there's a really cool pottery blog in French that you'd like to read? Well, if you're using Google Reader, it's a snap. (If you're not, see my post on using Google Reader here) Remember in that previous Tech Tuesday how I showed you how to subscribe to blogs? Just a simple extra step will have you reading foreign blogs.
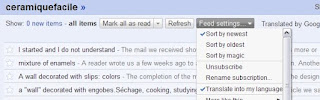
With the feed selected, go to the [Feed Settings] button, and just click on [Translate to my language]
and, as the French say, Voila'
English!
One big way I find other pottery blogs is by checking out the blogrolls of blogs I already read. So once you find a few non-English blogs, a whole other world opens up. The world of pottery (and other) blogs just got a lot bigger!
And for everyone in other countries reading in your native language, welcome! and thank you for reading! If you have or know of a pottery blog in your language, I'd love to hear about it.
Tuesday, February 23, 2010
Tech Tuesday - Feed readers 101
Last week I talked about FeedBurner, a way to track how many people are subscribed to your blog feed. Along the way, I realized I was following over 200 blogs (I hadn't really checked in a while).
Clearly, trying to visit that many blogs individually via blogrolls or bookmarks would take forever, and seriously impact my mental health. I figured out early on that if I wanted to keep track of all the pottery blogs I was finding, I'd have to use a feed reader.
Feed readers can be separate programs you install on your PC, or web applications you access through your web browser. I've experimented with feed reader plugins for Firefox, and a social media browser called Flock that has very nice feed reading and management. Ultimately, I've settled on using Google's Reader app.
Since it's a web app, it's available wherever there's access to a web browser - it doesn't have to be installed on every computer I want to use it on, and that also means that all the history of read posts is there and searchable as well.
Using it is pretty self explanatory, just head over to https://www.google.com/reader/view/ and log in with your google/gmail account.
There are a couple ways to add feed to your Reader. One is to click on the [Add Subscription] button in the upper-left, and type in the URL of the blog you want to add. In most cases, Reader will find the feed and add it. Or, while visiting a blog, you can click the Subscribe link if one is provided.
Now you have one place to go to find all your blog subscriptions. You can quickly go through the unread posts using the [Previous] and [Next] buttons. I starting at the 'bottom' of the list and using [Previous], which keeps me in chronological order.
You might notice that a blog here or there doesn't show the entire post, only a few sentences, or sometimes just the post title. This is because the blog is set to only show a limited feed, presumably to get you to click through to the actual blog. If you're not putting ads or affiliate links or otherwise monetizing your blog, there really isn't a reason to do this. Here's how to turn on 'full' feeds and be more 'feed reader friendly':
In Blogger:
Look under the Settings tab, and set 'Allow blog feeds' to 'Full'
In Wordpress:
Look under the Settings > Reading menu. In the Reading settings, select 'For each article in a feed, show Full Text'
Other platforms will generally have a similar setting somewhere in the control panel. Take a look around.
Other platforms will generally have a similar setting somewhere in the control panel. Take a look around.
Tuesday, February 16, 2010
Tech Tip Tuesday - FeedBurner
I've been thinking about doing something like this for a while now. My time in the actual clay studio is still so intermittent that I just can't seem to get a lot accomplished. I'll get there, but it's slow going for now.
I also thought I'd share some of the knowledge from my 'other' life in IT. I read a lot of pottery/art blogs (200?!, jeez, how did -that- happen?? Look for a future tech tip on how I do this without spending all day, or losing my mind.), and occasionally see a tech question or issue pop up. When I can, I try to suggest an answer, or point them in the right direction to a solution.
Yesterday, the question came up about how many subscribers my wife had on her blog. Not an easy question, but there are ways to at least get an idea. The tool we're going to look at today is FeedBurner. Yes, it's by Google, and you'll need a Google account to use it. Since a lot of the blogs I see are Blogger blogs, shouldn't be a big deal for most of you. Let's head on over to feedburner.google.com and get started. Don't worry, I'm starting out with an easy one here. It's not hard, and Google actually has pretty good help docs to get you set up. Here's my 'Quick Start'
Step 1- Get your google account and sign in at feedburner.google.com Done? good.
Step 2 - 'Burn' your feed. (hey, don't blame me, I didn't come up with this lingo..) Just type your blog URL or your feed URL if you happen to know what it is, in the box 'Burn a feed this instant' and click [Next]. More than likely, FeedBurner will say that it has found multiple feeds, which one do you want to use? For Blogger users, the default Atom feed is fine. It should look something like /feeds/post/default. Make your selection and press [Next]
Now finish up by giving your feed a name. It defaults to your blog title, so you'll probably just want to leave it as-is. Below that, you'll see your blogs 'new' feed address. You could write this down for later, but theres an easier way. Press [Next].
Now just [right-click] on your feed URL and [Copy link address] or [Copy link location] -depends on your web browser.
You can continue on and set up some additional tracking features, but hey, we're just getting started with this whole thing, so let's keep it simple. You can always go back and play with the advanced settings later...
Press the [Skip directly to feed management] link. You should now see your feed listed in your control panel.
Step 3 - Redirect your Blogger feed.
So now, go log into your Blogger account, and go to your Dashboard. Click the [Settings] tab, and [right-click] [Paste] your feedburner URL into the 'Post Feed Redirect URL' box. While you're here Make sure the 'Allow Blog Feeds' is set to 'Full', or at least NOT set to 'None' (again, look for more about this in a future TechTip) then click [Save Settings]
You're done!
You now can check your feed stats by logging in to feedburner.goggle.com and selecting your feed. If you have multiple sites or blogs, you can set up a feed for each of them and manage them here.
It usually take about a day for things to sync up and data to start coming in, but soon you should start seeing subscription info and other stats in your FeedBurner reports. Poke around a bit, there's some neat stuff you can find out, some things might surprise you.
I also thought I'd share some of the knowledge from my 'other' life in IT. I read a lot of pottery/art blogs (200?!, jeez, how did -that- happen?? Look for a future tech tip on how I do this without spending all day, or losing my mind.), and occasionally see a tech question or issue pop up. When I can, I try to suggest an answer, or point them in the right direction to a solution.
Yesterday, the question came up about how many subscribers my wife had on her blog. Not an easy question, but there are ways to at least get an idea. The tool we're going to look at today is FeedBurner. Yes, it's by Google, and you'll need a Google account to use it. Since a lot of the blogs I see are Blogger blogs, shouldn't be a big deal for most of you. Let's head on over to feedburner.google.com and get started. Don't worry, I'm starting out with an easy one here. It's not hard, and Google actually has pretty good help docs to get you set up. Here's my 'Quick Start'
Step 1- Get your google account and sign in at feedburner.google.com Done? good.
Step 2 - 'Burn' your feed. (hey, don't blame me, I didn't come up with this lingo..) Just type your blog URL or your feed URL if you happen to know what it is, in the box 'Burn a feed this instant' and click [Next]. More than likely, FeedBurner will say that it has found multiple feeds, which one do you want to use? For Blogger users, the default Atom feed is fine. It should look something like
Now finish up by giving your feed a name. It defaults to your blog title, so you'll probably just want to leave it as-is. Below that, you'll see your blogs 'new' feed address. You could write this down for later, but theres an easier way. Press [Next].
Now just [right-click] on your feed URL and [Copy link address] or [Copy link location] -depends on your web browser.
You can continue on and set up some additional tracking features, but hey, we're just getting started with this whole thing, so let's keep it simple. You can always go back and play with the advanced settings later...
Press the [Skip directly to feed management] link. You should now see your feed listed in your control panel.
Step 3 - Redirect your Blogger feed.
So now, go log into your Blogger account, and go to your Dashboard. Click the [Settings] tab, and [right-click] [Paste] your feedburner URL into the 'Post Feed Redirect URL' box. While you're here Make sure the 'Allow Blog Feeds' is set to 'Full', or at least NOT set to 'None' (again, look for more about this in a future TechTip) then click [Save Settings]
You're done!
You now can check your feed stats by logging in to feedburner.goggle.com and selecting your feed. If you have multiple sites or blogs, you can set up a feed for each of them and manage them here.
It usually take about a day for things to sync up and data to start coming in, but soon you should start seeing subscription info and other stats in your FeedBurner reports. Poke around a bit, there's some neat stuff you can find out, some things might surprise you.
Subscribe to:
Posts (Atom)


